One of the most notorious misses on Google Analytics 4. Is the lack of AMP (Accelerated Mobile Pages) Pages tracking support. While this may not be an issue for many sites, there’re some website types that really need this support (like media sites or magazines).
That’s why I decided to investigate the possibilities of <amp-analytics> Component and APIs in order to try to build an AMP Native Tracking without needing to draw on some tricky methods like using the infamous iframes.
I’ve been testing everything I could and everything seems to be working fine. I’m open to receiving feedback from people that may end up trying this solution, which may not end up being perfect, but still is more than what we actually have.
The good news is that we’ve got all the needed pieces of information available to perform a fully working tracking with Google Analytics 4, including the session tracking and the needed switched to have the, first_visit, session_start, user_engagment events generated, and as an unexpected extra we’ll be able to set event parameters and user properties within our events
If you feel it you could buy me some coffees to support my work, this time I’m even hosting a copy of the file myself to ease the work (which depending on the traffic may lead to some costs for me.
Issues / Errors Reporting
Please report any issues/improvements on the project page on GITHUB
What features are supported
While I may have missed something, I tried to cover all the basics for the tracking and event at some point going beyond it as you’ll notice in the next lines.
The current version does enable the page_view tracking (will fire on the page load if not specified in another way) along with any other event you may want to send.
This is a list of all supported features:
- Sessions Tracking
- Session Engagements (
&seg) - Sessions Count (
&sct) - First Visits Tracking (
&_fv) - Session Starts Tracking (
&_ss) - AMP Cross-Domain
- User Properties (number and string)
- Event Parameters (number and string)
- Engagement Time Tracking (
&_et) - Screen Resolution
- User’s Browser Language
- Document Title
- Document URL
- Document Referrer
- Unique Pageview Id (
&_p)
Setting up the tracking
Tracking Snippet Component
Using the Session Data in AMP is forbidden when using Remote Configurations, this is why we are using the googleanalytics as a base, which will at the same time help in using and managing the reading/writing of the _ga cookie.
The only thing we need to do is copy the following code in our AMP pages in order to have our Google Analytics 4 tracking in place
<amp-analytics type="googleanalytics" config="https://amp.analytics-debugger.com/ga4.json" data-credentials="include">
<script type="application/json">
{
    "vars": {
                "GA4_MEASUREMENT_ID": "G-THYNGSTER",
                "GA4_ENDPOINT_HOSTNAME": "www.google-analytics.com",
                "DEFAULT_PAGEVIEW_ENABLED": true,
                "GOOGLE_CONSENT_ENABLED": false,
                "WEBVITALS_TRACKING": false,
                "PERFORMANCE_TIMING_TRACKING": false,
                "SEND_DOUBLECLICK_BEACON": false
    }
}
</script>
</amp-analytics>
As you may have noticed there’re many configuration switches, we’ll later explain them all in a deeper way, but for now, the only one you should care about is the “GA4_MEASUREMENT_ID” one. You need to add your MEASUREMENT_ID in there.
You can grab that value from Admin > Properties > Data Streams > Web and then selecting your Stream

As a small sneak-peak, this is the meaning for all the configuration switches.
| Feature Name | Description |
|---|---|
| GA4_MEASUREMENT_ID | Your Measurement ID, G-XXXXXXXX |
| GA4_ENDPOINT_HOSTNAME | Override the default endpoint domain. In case you want to send the hits to your own server or a Server Side GTM Instance. |
| GOOGLE_CONSENT_ENABLED | a &gcs parameter will be added to the payloads with the current Consent Status |
| WEBVITALS_TRACKING | If you enable this a webvitals event will fire 5 seconds after the page is visible |
| PERFORMANCE_TIMING_TRACKING | Whatever you want to push a performance_timing event including the current page load performance timings |
| DEFAULT_PAGEVIEW_ENABLED | If enabled a page_view event will fire on the page load |
| SEND_DOUBLECLICK_BEACON | Send a DC Hit |
Important Note
I’ve put an online copy of the configuration file for those who can’t host themselves, if you can get some collaboration, I suggest you to download the ga4.json from GitHub and hosting it yourself.
config="https://yourdomain.com/ga4.json"Server Side GA4 Tracking (SGTM)
If you prefer it you can have AMP send the hits to a Server Side GTM instance. for doing this set the current
GA4_ENDPOINT_HOSTNAME: "sgtm.thyngster.com"If you prefer sending a copy of the hits to some internal database or any other tool, the logic is pretty straightforward so I don’t think it needs any explanation just, set your domain there and be sure that you enable an endpoint on the following path “/g/collect“
Consent Compliance
This Google Analytics 4 tracking solution for AMP pages, supports the integration with the consent module from AMP and also with Google Consent Mode ( allowing you to attach the consent details to the hits )
Keep reading this section if you are interested in having a Consent compliance setup in your AMP Pages.
Google Consent Activation
You can have the hits to hold the information about the current consent status. This will make the tracking compatible with the Google Consent Features. If you turn on this feature the current consent status will be reported within the current event hit, allowing Google Analytics to be more GDRP Compliant (#sigh) and at the same time allowing you to make use of the consent mode modeling when it became available in the future.
To activate this you need to set the “ENABLE_CONSENT_TRACKING” switch to true, and then a a &gcs parameter will be added to all the hits, containing the actual consent status for the browsing user.
It will hold 2 different values
| Value | Meaning |
|---|---|
| G100 | Analytics Consent Non-Granted |
| G101 | Analytics Consent Granted |
Blocking Google Analytics 4 – No Consent
In case you want to block the tracking unless the user has implicitly given his consent you can make GA4 not to fire any hits in your AMP pages. This can be easily achieved by adding the following attribute to our amp-analytics block,
data-block-on-consentNow our main snippet will looks closely to this:
<amp-analytics
    type="googleanalytics"
    config="https://amp.analytics-debugger.com/ga4.json"
   data-credentials="include"
   data-block-on-consent
>
Two things will happen when you add this, first one if that if the current user didn’t give his explicit consent to be tracked, no hits will be sent to Google Analytics and when the user accepts the consent, AMP will fire hits that were blocked on a first instance.
Please note, that this functionality relies on the <amp-consent> component, you need to load the right library and also setup the consent modal in the way you want. A simple example would be something like:
<script async custom-element="amp-consent" src="https://cdn.ampproject.org/v0/amp-consent-0.1.js"></script>
<script async custom-element="amp-geo" src="https://cdn.ampproject.org/v0/amp-geo-0.1.js"></script>
<amp-consent layout="nodisplay" id="consent-element">
  <script type="application/json">
    {
      "consentInstanceId": "my-consent",
      "consentRequired": "remote",
      "checkConsentHref": "https://example.com/api/check-consent",
      "promptUI": "consent-ui",
      "onUpdateHref": "https://example.com/update-consent"
    }
  </script>
  <div id="consent-ui">
    <button on="tap:consent-element.accept">Accept</button>
    <button on="tap:consent-element.reject">Reject</button>
    <button on="tap:consent-element.dismiss">Dismiss</button>
  </div>
</amp-consent>
Events Tracking
Pageviews Tracking
By default a page_view event that will fire on the page load unless you set the DEFAULT_PAGEVIEW_ENABLED to false. There may be a case where you want to personalize the page_view event name, or maybe you need to add some custom parameters to it.
If that’s your case, set the default page view to false, and then add a new trigger to fire a page_view event are your own into the init config:
"custom_pageview": {
    "enabled": true,
    "on": "visible"
    "request": "ga4Event",
    "vars": {
        "ga4_event_name": "my_customized_page_view"
    },
    "extraUrlParams": {
        "event__str_real_url": "https://www.charlesfarina.com/?origin=thyngster",
        "event__str_param_2": "meh"
    }
}
Custom Events
Remember in GA4 “everything is an event“, well, I tried to set up a configuration logic that allows you to track many user interactions using the currently provided functionality in AMP API.
This is cool because we’re going even be able to pass User Properties and Event Parameters to our events
AMP Events Types
By default no other events than the “page_view” are tracked. But you can use any of the AMP event types to track your users interactions.
There are some more that are not currently properly documented on the main docs, so we’re not covering them. You can read the original docs here:
click | When there’s a click on an element |
hidden | When the page becomes hidden |
ini-load | When the initial contents of an AMP element or AMP document have been loaded. |
render-start | When the rendering of an embedded component has started (ie : ads iframes) |
scroll | When under certain conditions when the page is scrolled |
timer | When on a regular time interval |
video-* | When there’s a video interaction |
visible | When an element becomes visible |
blur | When a specified element is no longer in focus |
change | When a specified element undergoes a state change |
user-error | When an error occurs that is attributable to the author of the page or to software that is used in publishing the page |
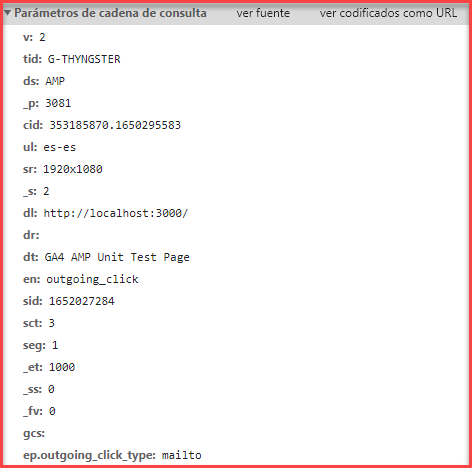
Event: click
"triggers": {
  "mailtos": {
    "on": "click",
    "selector": "a[href^='mailto:']",
    "request": "ga4Event",
    "vars": {
      "ga4_event_name": "outgoing_click"
    },
    "extraUrlParams": {
         "event__str_outgoing_click_type": "mailto"
    }
  }
}
This is the main one that we’ll be using, it triggers when an element is clicked, and we’ll use a CSS selector to define the conditional firing.
Another typical example would be tracking the external links, we could achieve this with the following trigger:
"triggers": {
"mailtos": {
"on": "outgoing",
"selector": "a[href]:not(:where([href^='#'],[href^='/']:not([href^='//']), [href='thyngster.com'], [href='analytics-debugger.com'])",
"request": "ga4Event",
"vars": {
"ga4_event_name": "outgoing_click"
},
"extraUrlParams": {
"event__str_outgoing_click_type": "link"
}
}
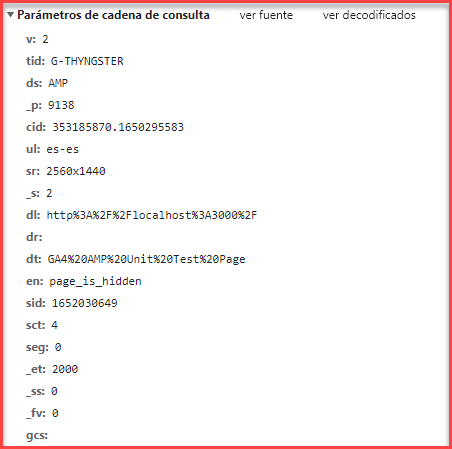
}Event: hidden
We can set a trigger when the current page is hidden ( ie: minimized, or the browser’s tab is switched )
If we include the visibilitySpec , we can define some rules, for example firing it only if it has been hiding for 3 seconds, see the example below
"triggers": {
  "pageHidden": {
    "on": "hidden",
    "request": "ga4Event",
    "vars": {
      "ga4_event_name": "page_is_hidden"
    },
    "visibilitySpec": {
      "selector": "body",
      "visiblePercentageMin": 20,
      "totalTimeMin": 3000
    }
  }
}
I won’t dig more on this, you can check all the visibilitySpec options on the following URL: https://github.com/ampproject/amphtml/blob/main/extensions/amp-analytics/amp-analytics.md
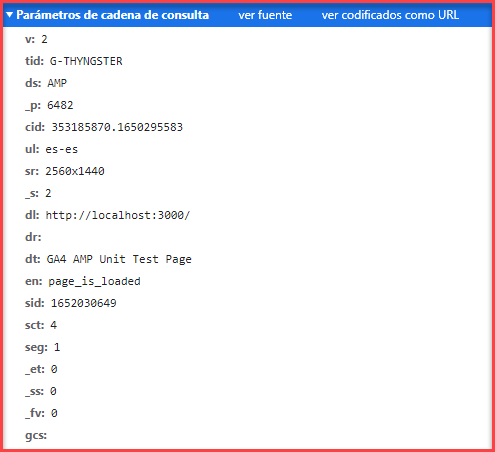
Event: ini-load
We can have AMP triggering an event when an AMP Element initial content has been loaded, this is done using a CSS Selector, if the selector is not specified this event will be attached to the current document.
"triggers": {
 "pageLoaded": {
    "on": "ini-load",
    "request": "ga4Event",
    "vars": {
        "ga4_event_name": "page_is_loaded"
     }
  }
}
Event: render-start
AMP will trigger this event when an element that embeds other documents in iframes for example the Ads Elements
"adsLoaded": {
"on": "render-start",
"request": "ga4Event",
"vars": {
"ga4_event_name": "ads_loaded"
},
"selector": "#ads"
}
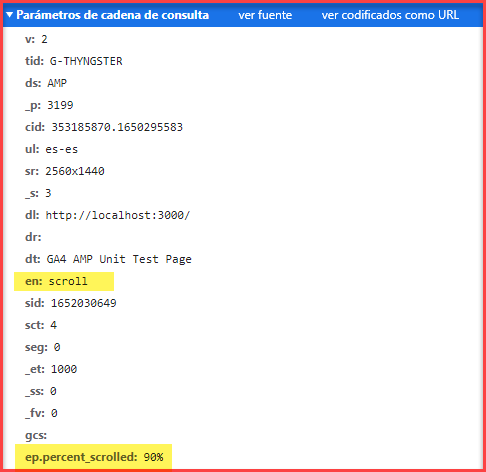
}Event: scroll
When a page is scrolled AMP will trigger the scroll event. This trigger provides special vars that indicate the boundaries that triggered a request to be sent. In order to filter which scroll events we want to fire we’ll use the scrollSpec object.
We can use the ${verticalScrollBoundary} variable to grab the current scrolling boundary. Here it goes a simple example that will trigger an event when the user scrolls to a 25, 50, 75, 90 of the current page.
"scrollTracking": {
    "on": "scroll",
    "request": "ga4Event",
    "vars": {
        "ga4_event_name": "scroll"
    },
    "extraUrlParams": {
        "event__str_percent_scrolled": "${verticalScrollBoundary}%"
    },
    "scrollSpec": {
        "verticalBoundaries": [25, 50, 75, 90],
        "horizontalBoundaries": [],
        "useInitialPageSize": false
    }
}
Event: timer
As the name suggests this will allow us to send and event based on a regular time interval to GA4. We can also use timerSpec to control when this will fire.
Please note it’s important to know that the timer will keep triggering until maxTimerLength has been reached. Another thing that you need to have in mind is that we can use startSpec to define then this trigger should fire. For example we may want to send a ping event each minute the page is active, but we want to step in if the document is hidden, we could do the following
"triggers": {
  "pingEvents": {
    "on": "timer",
    "request": "ga4Event",
    "vars": {
        "ga4_event_name": "ping"
    },
    "timerSpec": {
      "interval": 60,
      "startSpec": {
        "on": "visible",
        "selector": ":root"
      },
      "stopSpec": {
        "on": "hidden",
        "selector": ":root"
      }
    },
  }
}
Refer to the AMP docs for full details about how to use the timer events.
Event: video-*
I feel this is the most complicated trigger available on AMP. It will allow us to track the video interactions happening on our site in Google Analytics 4.
Multiple video providers are supported by AMP Analytics, these are defined in the following table:
| Video Provider | Support level |
|---|---|
<amp-video> | Full support |
<amp-3q-player> | Partial support |
<amp-brid-player> | Partial support |
<amp-brightcove> | Full support |
<amp-dailymotion> | Partial support |
<amp-ima-video> | Partial support |
<amp-nexxtv-player> | Partial support |
<amp-ooyala-player> | Partial support |
<amp-youtube> | Partial support |
<amp-viqeo-player> | Full support |
Partial support means that not all the variables may be available:
| Var | Type | Description |
|---|---|---|
autoplay | Boolean | Indicates whether the video began as an autoplay video. |
currentTime | Number | Specifies the current playback time (in seconds) at the time of trigger. |
duration | Number | Specifies the total duration of the video (in seconds). |
height | Number | Specifies the height of the video (in px). |
id | String | Specifies the ID of the video element. |
playedTotal | Number | Specifies the total amount of time the user has watched the video. |
state | String | Indicates the state, which can be one “playing_auto”, “playing_manual”, or “paused”. |
width | Number | Specifies the width of video (in px). |
playedRangesJson | String | Represents segments of time the user has watched the video (in JSON format). For example, [[1, 10], [5, 20]] |
For now, we know which video players are supported and which data we will be able to use in our events, know it’s time to know which triggers/interactions we’ll be able to track, these are:
| Trigger Name | Description |
video-play | Video stats to play |
video-pause | Video is paused |
video-ended | Video Completes (reach end of playback) |
video-session | Triggers when a “video session” has ended. a video session starts when a video is played and finishes when the video is paused, ends, or became invisible |
video-seconds-played | This will trigger each time the defined amount of time is played ( ie: every 10 seconds watched ) |
video-percentage-played | Same as above we can define which % of the progress we want to trigger this |
video-ad-start | Video Ad Starts |
video-ad-end | Video Ads Ends |
As you can see, the possibilities are almost endless, so we won’t be adding examples for all of them, you can find some good examples on AMP documentation. In any case, let’s see one example.
Let’s say that our AMP page has a YouTube Video embedded:
<amp-youtube
id="Take off - LGA-YYZ . DL4942 - CRJ-900"
class="video"
width="480"
height="270"
data-videoid="Nx-JZ2-kEKU">
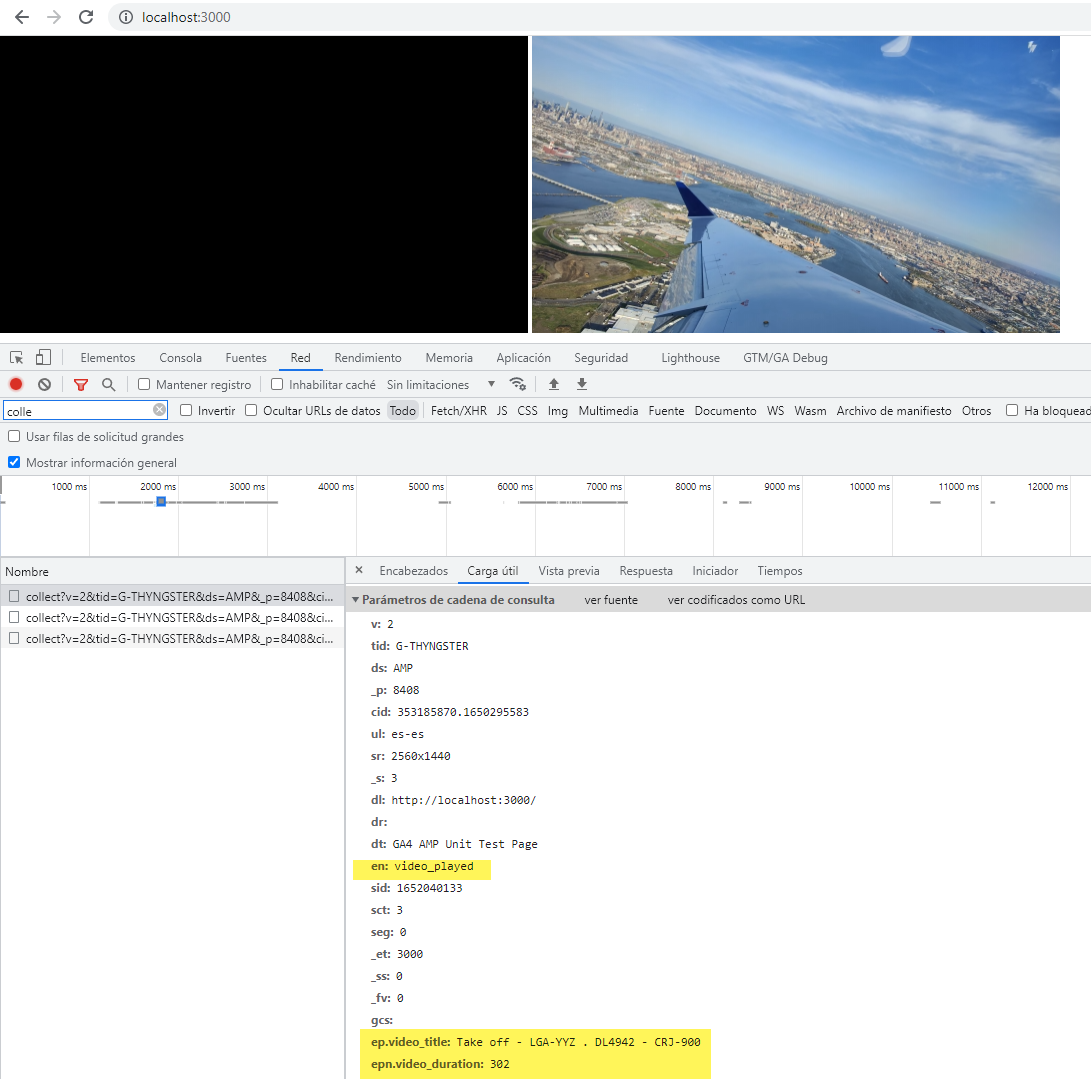
</amp-youtube>#TIP Using the element “id” with the video name will allow us to use it for the video_title parameter for our event
So, for tracking the video plays, we would add the following trigger:
"triggers": {
    "videoPlayEvent": {
        "on": "video-play",
        "request": "ga4Event",
        "vars": {
            "ga4_event_name": "video_played"
        },
        "selector": ".video",
        "videoSpec": {},
        "extraUrlParams": {
            "event__str_video_title": "${id}",
            "event__num_video_duration": "${duration}"
        }
    }
}
Event: visible
Using this event trigger we’ll be able to fire an event when the current element(s) defined with our CSS selector are visible within the current browser viewport.
This trigger firing can be fine-tuned using the visibilitySpec , to define the amount of millisecond the element has to be on the screen, or what % of the element needs to be visible to trigger the event.
Refer to the AMP official docs for all the configuration options 🙂
"triggers": {
    "recomendationsViewed": {
        "on": "visible",
        "request": "ga4Event",
        "vars": {
            "ga4_event_name": "recomendations_block_viewed"
        },
        "selector": "#adobeTargetRecos",
        "visibilitySpec": {
            "waitFor": "ini-load",
            "reportWhen": "documentExit",
            "visiblePercentageMin": 20,
            "totalTimeMin": 500,
            "continuousTimeMin": 200
        }
    }
  }
}
In-Build Auto-Generated Events
There is some data provided by AMP that is available and that can provide some cool events, in this first release I’ve added two events to track our page loading speed.
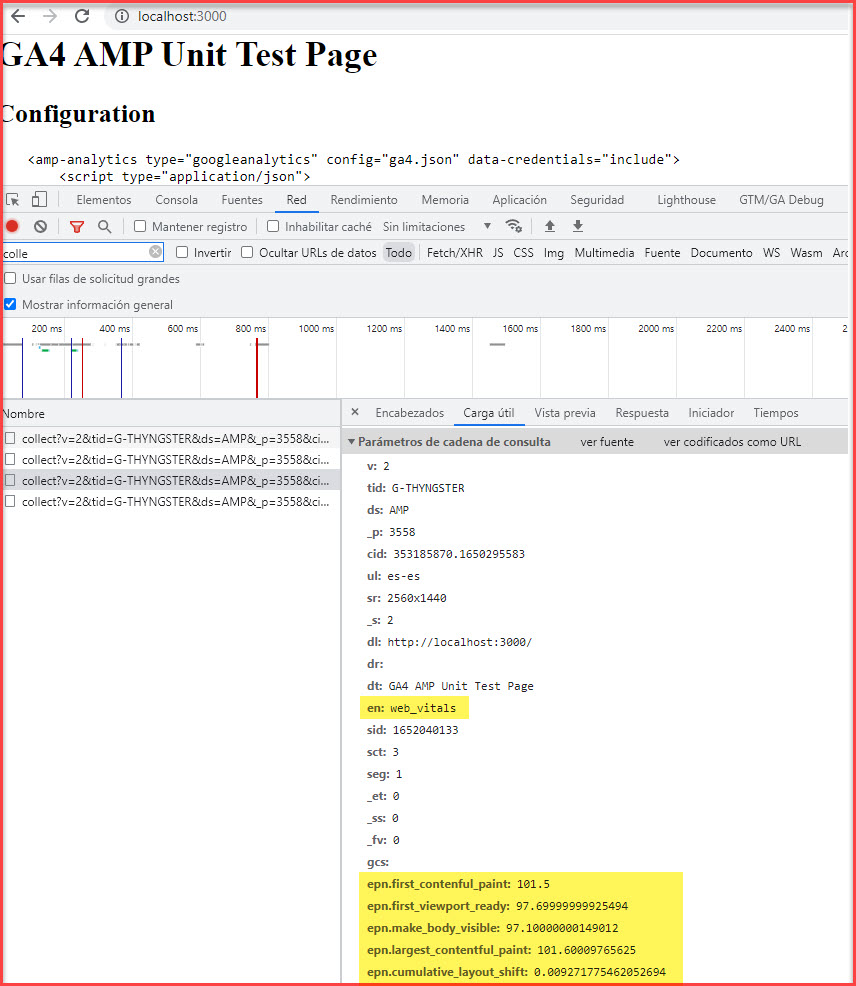
WebVitals
You can enable web vitals tracking events, which we expect to be the best ones on AMP ( don’t we’? )
To enable this event just set the “ENABLE_WEBVITALS_TRACKING” to true in the main snippet settings, and that will make the tool launch an automatic event (web_vitals) 5 seconds after the page load, with the following available parameters:
| Parameter | Description | Example Value |
|---|---|---|
| epn.first_contentful_paint | First Contentful Paint | 170.199951171875 |
| epn.first_viewport_ready | First Viewport Ready | 164.59999990463257 |
| epn.make_body_visible | Make Body Visible | 163.40000009536743 |
| epn.largest_contenful_paint | Largest Contentful Paint | 170.299072265625 |
| epn.cumulative_layout_shift | Cumulative Layout Shift | 0.012389976353126643 |
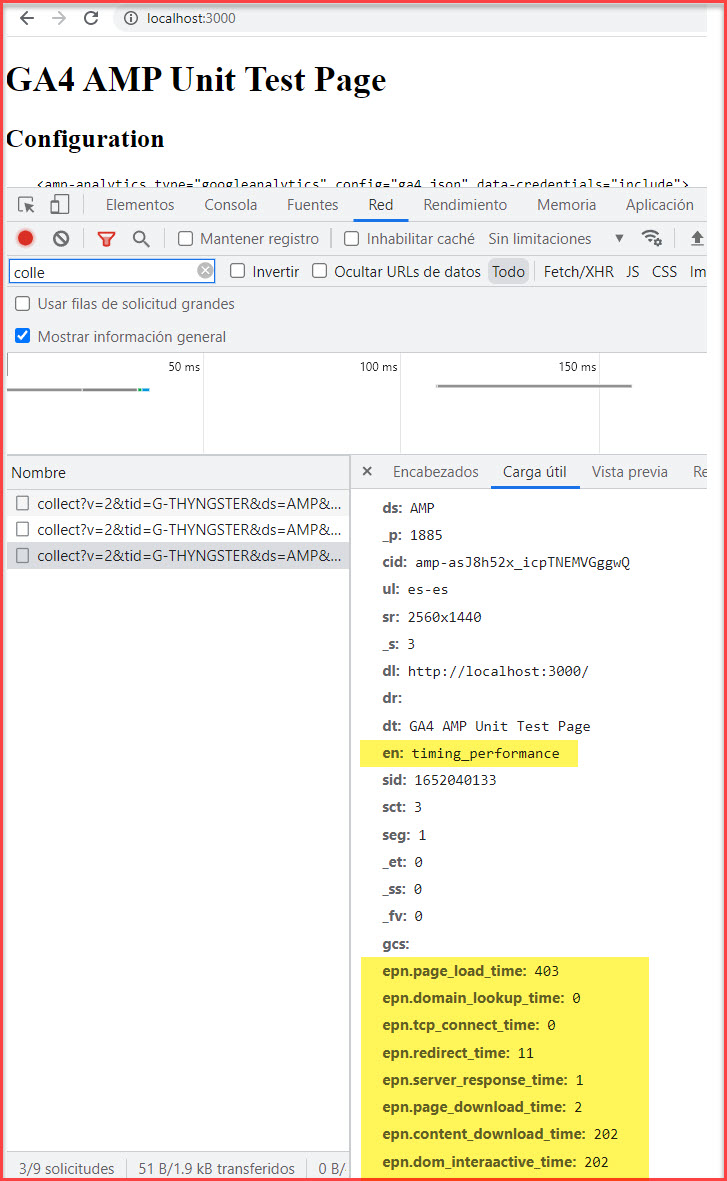
Performance Timing
This is the same data that we are used to seeing in the Site Speed Reports in Universal Analytics, which includes the time (in ms) to the DomReady event or the time it took to do the DNS Resolution Time.
To enable this event just set the PERFORMANCE_TIMING_TRACKING to true. Then on the page load, a performance_timing event will be fired containing the following parameters.
| epn.page_load_time | Amount of time (in seconds) it took that page to load |
| epn.domain_lookup_time | The average time (in seconds) spent in DNS lookup for this page |
| epn.tcp_connect_time | Provides the time it took for HTTP connection to be set up. The duration includes connection handshake time and SOCKS authentication. The value is in milliseconds. |
| epn.redirect_time | Time taken to complete all the redirects before the request for the current page is made (in ms) |
| epn.server_response_time | Total time taken by the server to start sending the response after it starts receiving the request (in ms) |
| epn.page_download_time | Provides the time taken to load the whole page. The value is calculated from the time unload event handler on previous page ends to the time load event for the current page is fired. If there is no previous page, the duration starts from the time the user agent is ready to fetch the document using an HTTP request (in ms) |
| epn.content_download_time | Provides the time the page takes to fire the DOMContentLoaded event from the time the previous page is unloaded (in ms) |
| epn.dom_interactive_time | Provides the time the page to become interactive from the time the previous page is unloaded (in ms) |
User Properties
To attach User Properties to our hits, we need to use the extraUrlParams key. We also need to have in mind that a User Property in GA4 can either be a number or a string and while the GTAG/GTM does take care of accordingly casting the values, on AMP we need to define the type.
The way we should define the parameters is this:
"user__str_user_id": "123456",
"user__num_lifetime_value": "147.34"
As you can see is easy, the first part defines the current scope (which will be event for the Event Parameters in the next section ).
If we add the User Properties to our main snippet, these will be added to all the subsequent events fired within the current page load. In the next example, we are setting 3 User Parameters in our init code snippet that will be persisted across all the events pushed during the current page load.,
{
        "vars": {
            "GA4_MEASUREMENT_ID": "G-THYNGSTER",
            "ENABLE_CONSENT_TRACKING": false,
            "ENABLE_WEBVITALS_TRACKING": true
        },
        "extraUrlParams": {
            "user__str_user_id": "123456",
            "user__str_logged_in": "yes",
            "user__num_lifetime_value": "147.34"
        },
    }
On the other site, we can attach some User Parameters ONLY to the current event, this is done by adding the extraUlrParameters to the current trigger.
        "triggers": {
            "demoClickEvent": {
                "on": "click",
                "request": "ga4Event",
                "selector": "#upgradeMembership",
                "vars": {
                    "ga4_event_name": "member_ship_upgraded",
                },
                "extraUrlParams": {
                    "user__str_last_membership": "premium"
                }
            }
        }
Event Parameters
Same way as the User Properties above, we have two different ways of setting an Event Parameter, to all the current page events or just to the current event, this will be done, again, on the main init snippet, or adding it within the current trigger extraUrlParams.
And of course, remember that they need to define the type, string, or number.
The way we should define the parameter is the same as we did in the User Properties.
"event__str_user_id": "123456",
"event__num_lifetime_value": "147.34"